Developing your first npm library - Build, CI and Publish
Prerequisites
Node.js
Package manager:
npm(or any alternative likepnpm)Github account
npm account
Project structure
Create three folders for library source(src), testing(test), and compiled(dist).
project-root
|
+---dist
+---src
\---testInit repository
Init your repository and add .gitignore
git initdist
node_modulesInit package.json
npm init -yAdd package name for your project.
// package.json
{
  "name": "My first npm package",
}Add LICENSE
Install license for generating a LICENSE.
npm install license -DAdd MIT license or add other license, the author name is the same as the user.name in current git config.
npx license MIT
# or
npx licenseAdd TypeScript
Add as devDependency
npm install -D typescripttsconfig.json
npx tsc -init// tsconfig.json
{
"include": ["./src/**/*.ts"],
"exclude": ["./node_modules"],
"compilerOptions": {
"target": "es2016",
"rootDir": "./src",
"outDir": "./dist",
"esModuleInterop": true,
"forceConsistentCasingInFileNames": true,
"strict": true,
"skipLibCheck": true,
"noEmit": true
}
}Add tsup
tsup is a zero-config TypeScript bundler with a focus on simplicity and speed. It is designed to make it easy to bundle TypeScript code for the web without needing extensive configuration. The name "tsup" is derived from "TypeScript micro bundler."
npm install -D tsupAdd scripts in package.json
Add a script that calls tsup to help us build the source. And lint for get syntax checking.
// package.json
{
  "scripts": {
    "build": "tsup ./src/index.ts -d ./dist --format cjs,esm --dts",
    "lint": "tsc"
  }
}Build using tsup
Now add ./src/index.ts just for demonstration.
export const hello = () => console.log('Hello!');Then build it. And check compiled file in ./dist
npm run buildAdd vitest for testing
Vitest testing framework powered by Vite. It aims to position itself as the Test Runner of choice for Vite projects, and as a solid alternative even for projects not using Vite.
npm install -D vitestCreate a test
Add ./test/index.test.ts for demonstration.
import { describe, expect, it } from "vitest";

describe("Whatever", () => {
    it("should pass CI", () => {
        expect(1).toBe(1);
    });
});Add scripts for testing
// package.json
{
    "scripts": {
        "build": "tsup ./src/index.ts -d ./dist --format cjs,esm --dts",
        "lint": "tsc",
        "dev": "vitest", // watch the project
        "test": "vitest run"
    },
}Add script for CI
When CI runs, we should do syntax check first, then testing, finally build our library.
// package.json
{
    "build": "tsup ./src/index.ts -d ./dist --format cjs,esm --dts",
    "lint": "tsc",
    "dev": "vitest",
    "test": "vitest run",
    "ci": "npm run lint && npm run test && npm run build"
}Add CI action
With "ci" script, we can now set our workflow. Add .github/workflows/main.yml in project root.
# .github/workflows/main.yml
name: CI
on:
    push:
        branches:
            - "**"

jobs:
    build:
        runs-on: ubuntu-latest
        steps:
            - uses: actions/checkout@v4
            - uses: actions/setup-node@v4
              with:
                  node-version: 18
                  cache: npm
            - run: npm install
- run: npm run ciNow commit files and publish the branch to github, the workflow will auto run.
Set entries for your package
Compiled files in ./dist include index.js, index.mjs, index.d.ts and index.d.mts. "main" for commonjs entry, "module" for esm entry. This are the entries for other users to import your code. Also, include type info from index.d.ts.
{
  "main": "./dist/index.js",
  "module": "./dist/index.mjs",
  "types": "./dist/index.d.ts"
}Alpha version
In the early stage of development, we set the first version as 0.0.1. Working with changeset, each version will be automatically changed.
// package.json
{
    "version": "0.0.1"
}Access token from npm account
- Generate new automation token for your npm account.
- Open repository setting, find
security-Secrets and variables-Actions, add new repository secret with copied token value, and name the secret asNPM_TOKEN.
Add @changesets/cli
The changesets workflow is designed to help when people are making changes, all the way through to publishing. It lets contributors declare how their changes should be released, then we automate updating package versions, and changelogs, and publishing new versions of packages based on the provided information.
npm install @changesets/cli -Dchangeset init
npx changeset initAfter initialization, .changeset/config.json is added in project root. Please check if "baseBranch" is same as your branch.
/* .changeset/config.json  */
{
  "$schema": "https://unpkg.com/@changesets/config@3.0.0/schema.json",
  "changelog": "@changesets/cli/changelog",
  "commit": false,
  "fixed": [],
  "linked": [],
  "access": "restricted",
  "baseBranch": "master",
  "updateInternalDependencies": "patch",
  "ignore": []
}Ready to release? changeset your version
Once you are ready to release the initial version, do
npx changesetPublish automation
Add "release" script
For releasing, we first do CI. If everything is fine, changeset publishes it.
{
  "scripts": {
    "build": "tsup ./src/index.ts -d ./dist --format cjs,esm --dts",
    "lint": "tsc",
    "dev": "vitest",
    "test": "vitest run",
    "ci": "npm run lint && npm run test && npm run build",
    "release": "npm run ci && npx changeset publish"
  }
}Add publish action
Add publish.yml in .github/workflows/
# .github/workflows/publish.yml
name: Publish
on:
    push:
        branches:
            - "master"

concurrency: ${{ github.workflow }}-${{ github.ref }}

jobs:
    publish:
        runs-on: ubuntu-latest
        steps:
            - uses: actions/checkout@v4
            - uses: actions/setup-node@v4
              with:
                  node-version: 18
                  cache: npm

            - run: npm install
            - name: Create Release Pull Request or Publish
              id: changesets
              uses: changesets/action@v1
              with:
                  publish: npm run release
              env:
                  GITHUB_TOKEN: ${{ secrets.GITHUB_TOKEN }}
NPM_TOKEN: ${{ secrets.NPM_TOKEN }}What files to release? - Add .npmignore
.npmignore excludes the files we don't want to release in npm as a package. We should exclude all develop-stage files but compiled files in ./dist and package.json, CHANGELOG.md as well as LICENSE.
src
.changeset
.github
.editorconfig
package-lock.json
tsconfig.jsonPublish your package
Make sure changeset release your library as public.
// .changeset/config.json
{
  "$schema": "https://unpkg.com/@changesets/config@3.0.0/schema.json",
  "changelog": "@changesets/cli/changelog",
  "commit": false,
  "fixed": [],
  "linked": [],
  "access": "public",
  "baseBranch": "master",
  "updateInternalDependencies": "patch",
  "ignore": []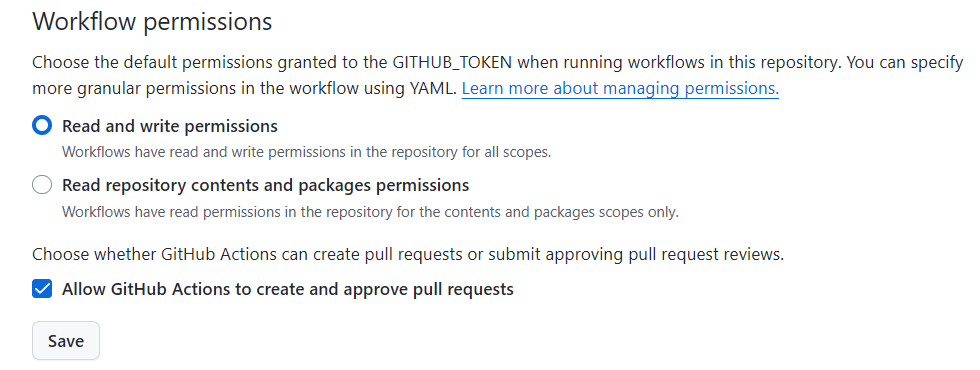
}Before you commit, check if workflow has permission to perform actions.
Then commit the current stage, sync to repository, when publish action completed, an auto generated pull request is right there.
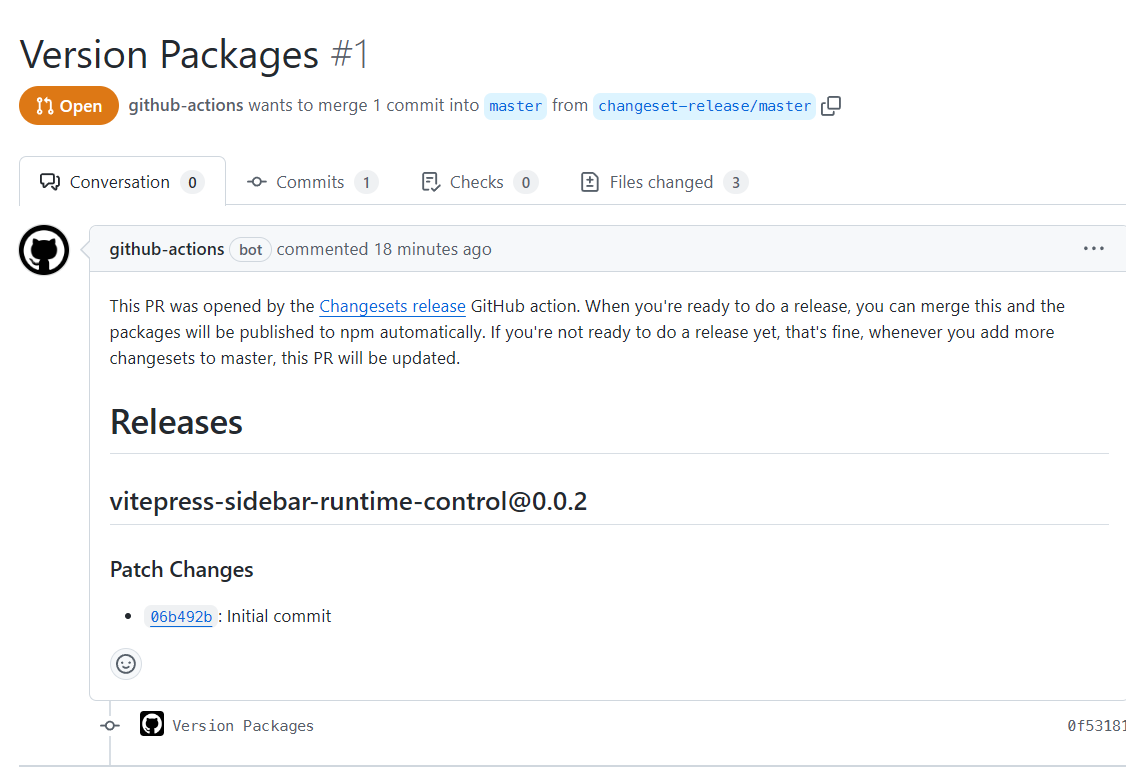
Now simply merge the pull request, the CI action will run to release your library in npm!
Add more info into package.json
// package.json
{
  "author": "sharpchen",
  "repository": {
    "type": "git",
    "url": "https://github.com/sharpchen/myfirst-npm-package/"
  },
  "homepage": "https://github.com/sharpchen/myfirst-npm-package/",
  "keywords": [
    // ...keywords for searching
  ],
  "license": "MIT",
  "description": "what this package do",
}How to work with it
Regular develop-stage
During regular development stage, we just do commit and sync to repository.
Ready to release a new version
If a version is ready, do
npx changesetThen
npx changeset versionAnd finally commit those changes, actions will start to work and publish the new version in npm!